
Author: admin

The chassis in detail: design and dimensioning

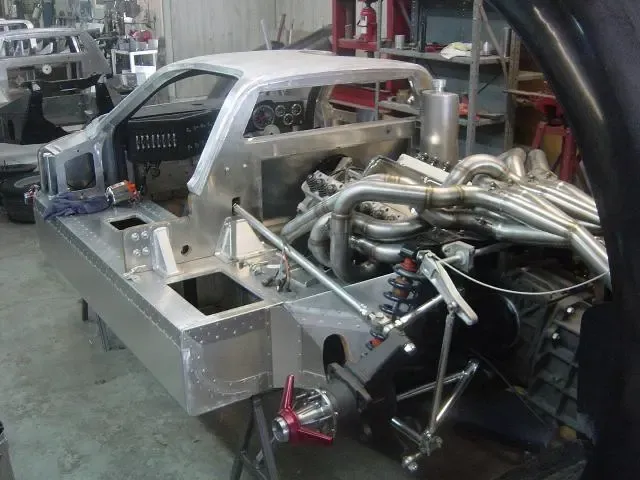
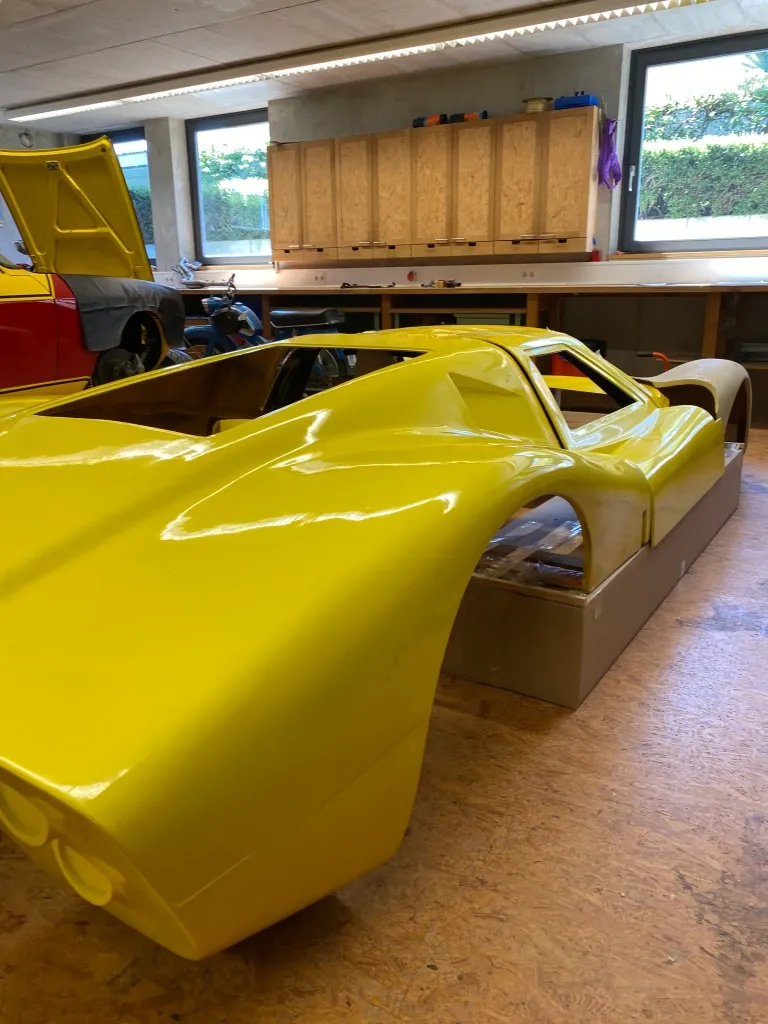
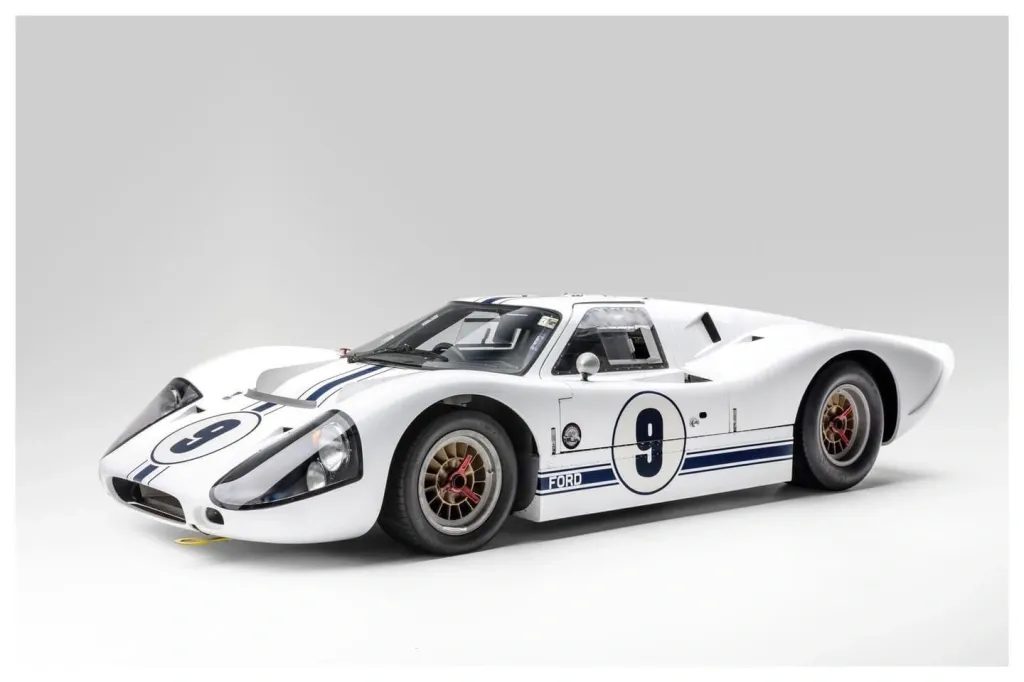
A chassis is not only the basis of a vehicle, but for me it was the key to combining tradition and innovation. When recreating this legendary racing car, my aim was to capture the technical dimensions and appearance of the original, while using modern production methods and materials to adapt the design to contemporary requirements.

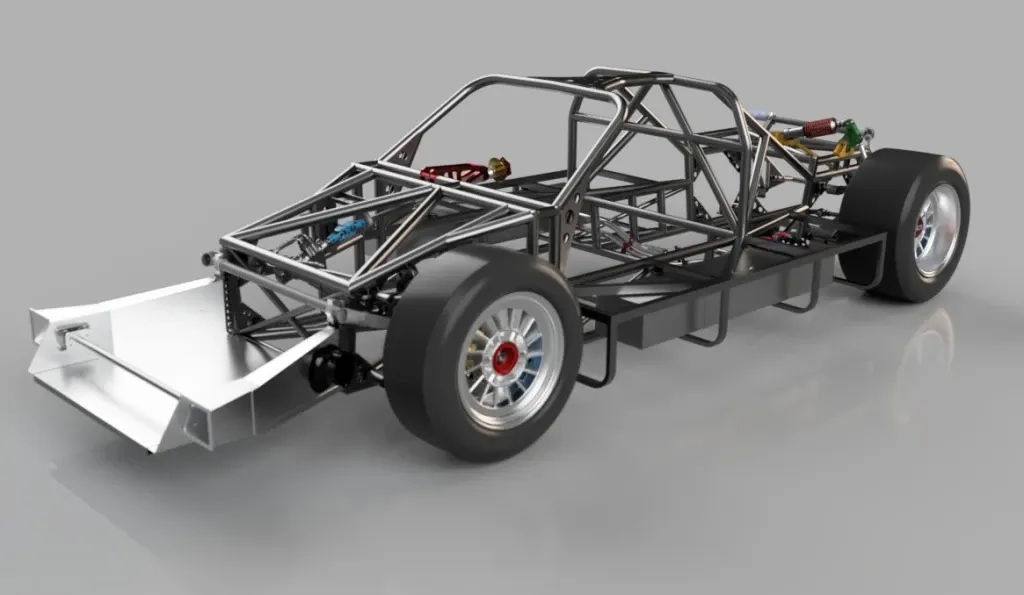
  1. Creating the tubular lattice frame in CAD – what methods are available?

    There are various ways of designing a tubular lattice frame in CAD, each of which has advantages and disadvantages. I have examined three common approaches:

    Modeling with cylindrical solids:
    Here, the pipes are modeled directly as cylindrical solids and joined together to form a frame. This method is simple and direct, but quickly reaches its limits with more complex designs, as adjustments are time-consuming and not very flexible.
    Modeling with lines and extrusion:
    A popular method is to first build the model with lines in 3D space that represent the centerlines of the pipes. Circles with the desired pipe cross-section are then extruded along these lines to create the pipes. The individual bodies are then adapted to each other using Boolean operations.
    Use of special pipe bending modules in CAD:
    Modern CAD programs often offer modules that have been specially developed for pipe designs. These make it easier to create complex bends and connections, but are often application- or industry-specific and require a certain amount of training.

    I opted for the second method because it was the easiest to implement with TurboCAD, which I used for the first drafts of the frame. This method gave me the necessary control over the geometry, while remaining flexible enough for customization.
    I later switched to Fusion360 due to the simulation requirements and stuck with this approach. Fusion360 gave me the ability to organize the cross sections of the pipes into lists. This made it theoretically possible to make changes to pipe diameters efficiently – a valuable feature if you want to try out different variants during the simulation.
    In practice, however, it turned out that this method quickly becomes very complex. For example, changes to the pipe diameter also affect the joints at the junctions. At the time, I did not manage to map the frame completely parametrically and thus generate variants. This was probably due to my limited knowledge of Fusion360 at the time.

    If anyone knows how to solve this challenge elegantly, I’d really like to learn!

  2. Dimensioning of pipes and material selection based on simulations

Fusion360 offers a powerful simulation module that makes it relatively easy to carry out FEM calculations. However, as is so often the case, the devil is in the detail, and I had to overcome numerous challenges, especially when dimensioning a tubular lattice frame.

The most difficult questions for me were:

  • Fixed points on the frame: Where exactly should these be defined in order to simulate realistic conditions?
  • Point of application and height of the load: How high is the load actually, for example when driving over a curb at 100 km/h? Such loads are difficult to estimate if no measured values are available.
  • Mesh fineness of the simulation: How fine must the FEM mesh be in order to deliver precise results without unnecessarily increasing computing times?
  • Safety factor: Which factor makes sense to factor in realistic reserves?

An additional problem arose from the geometry of my pipes: they taper at the junctions – often more sharply in CAD than is possible in reality. So-called “hotspots”, i.e. areas with extreme stress peaks, occur at these points. But are these realistic or an artifact of the simulation?

I would not have been able to overcome these challenges without external help. Fortunately, I had access to a valuable network:

  • A structural steel engineer, who was also a client of mine, introduced me to the basics of statics. That helped me to overcome the first stumbling blocks.
  • Andy Köhler from Motopark in Oschersleben was my most important support. As Technical Director of a successful racing team in formula racing and the GT3 class, Andy has invaluable knowledge. Thanks to his experience in vehicle construction and the use of sensors to measure peak loads on the racetrack, I was able to make my simulations much more realistic.

An important insight that I have gained through this collaboration:
Simulations are only as good as the underlying assumptions.
If these are wrong, the results are nothing more than colorful pictures with no practical value. In particular, the experience of an engineer who has spent countless hours on the racetrack cannot be replaced by software alone.

I can therefore only recommend having such simulations carried out by professionals if you do not have an appropriate network. It is money well spent, because familiarizing yourself with this subject is extremely time-consuming. It is also difficult to find reliable information, as a lot of racing know-how is closely guarded.

Beware of dangerous half-knowledge: Unrealistic advice often circulates on internet forums. Those who really know their stuff rarely comment publicly. Realistic load data is almost never shared, as it is an essential part of engineering know-how.

To summarize: without experienced support, my simulations would have been neither realistic nor feasible. Software alone is not enough – the combination of technical expertise and practical experience makes all the difference

3. the choice of pipe cross-section – a compromise between stability and manufacturability

During the development of the frame and the first simulations, I decided to replace the initially planned square tubes in the structurally highly stressed area of the cell with tubes with a round cross-section. There were several reasons for this change: Round tubes are more stable in all directions with the same material thickness and offer significant advantages, particularly in terms of energy absorption in the event of an accident.

But this decision brought with it new challenges:
When I showed the first CAD images of my frame in the GT40s.com forum, an experienced forum user immediately pointed out the significantly higher complexity of building a frame from round tubes. Unlike rectangular or square tubes, which are quite easy to cut and adapt yourself, round tubes run to the center of the other tube at the transitions. This creates complex junctions, especially when several pipes meet. Although these are more stable, they are also more difficult to produce.

At first I dismissed this tip somewhat lightly, as I was planning to have the pipes cut to size using a CNC laser anyway. But as the work progressed, I came across another problem:

Cladding the pipes with aluminum sheet
Attaching the aluminum sheets to round pipes proved to be unexpectedly challenging. For one thing, the bonding surface is smaller on round pipes than on square ones. Secondly, riveting presents additional difficulties:

  • Precision when drilling: The drill bit must hit the highest point of the pipe exactly to prevent it from slipping. This was often a real test of patience, especially in hard-to-reach places, and the drill bit breaks quickly – not fun when the tip is deep in the pipe.
  • Problems with slipping: The 25CrMo4 tube used is much harder than the aluminum sheet, which meant that a slipping drill quickly left an oval and therefore unusable hole in the aluminum sheet.

During the design phase, I decided to use rectangular tubes for the side boxes in which the tanks are housed. From a static point of view, these areas are only attached to the outside of the frame and are hardly stressed during normal driving. Right from the start, the focus here was on passive safety in the event of an accident – a topic that I will cover in more detail elsewhere.

Would I build my frame like this again?
Definitely. Despite the difficulties in production, the switch to round tubes in the central area of the cell was the right decision. Today, however, I would assess the challenges more realistically from the outset and plan more specifically. The gain in stability and safety is definitely worth the extra effort

The basis: from the idea to the digital model

It was clear to me from the outset that I could only really bring the project to life if I first built as complete a CAD model as possible – before I even set a single spot weld. That was crucial for me for two very clear reasons:

  1. Understanding the complexity and finding solutions
    A project like this is incredibly complex, and it was only through a digital model that I could really understand how everything fits together. This was the only way I could develop solutions for all the problems that inevitably arise – without realizing later on that something doesn’t fit. Of course, there were still mistakes, and quite a few – often due to carelessness, a lack of knowledge or simply my impatience, which sometimes made me rush ahead too quickly. But that’s part of it for me. After 4 years of building so far, I’ve become a little more humble.
  2. The need for efficient production
    Most parts of the chassis cannot be produced efficiently without a CAD model. Whether it’s CNC-milled parts, turned parts or laser-cut components – without the digital model, production would take much longer and be much more error-prone.

In the end, only with a CAD model is it possible for me to have an overview of the vehicle in its entirety and ensure that everything fits together seamlessly. This allows me to see all the details of the car before I start building it and to take measurements during construction, etc.

1. digitization of dimensions and data (plans, sketches).

The start of my CAD work was very simple: I began with a 2D plan view and side view to determine the basic dimensions of the vehicle. I used old documents that Ford had submitted when I registered for the Le Mans race. These included basic dimensions such as wheelbase, track width and the overall vehicle dimensions – in other words, everything you need for the initial rough dimensioning.

Using these values, I sketched the vehicle in a simple 2D representation in order to have the most important dimensions clearly laid out on a single document. The advantage of this approach was that I immediately got a clear overview without having to dive straight into the complexity of 3D modeling.

I used TurboCAD for these first steps, as the program offers particularly strong 2D functionality. It allowed me to draw the dimensions precisely and quickly, which was essential for this basic phase. I was able to use this simple template to build everything else later and develop the details step by step.

(You can find an overview of the software I used and still use for the construction here in this article)

2. sources of errorand initial stumbling blocks

My problem was a fundamental one that only really caught up with me when I was building. At the beginning there was a crucial question: Do I design the car from the outside in or vice versa?

For me, this was not really a question at first, because it seemed logical to construct from the outside in. Why? Quite simply – I already had all the necessary GRP body parts, and it was the first step for me to digitize these parts. My friend, who is a scaffolder, had kindly provided me with some scaffolding parts from the house construction, which I used to build a frame – thanks Lars!
I then attached the body parts to this frame and inserted the windshield to align the parts as well as possible.

I discovered that the components could be aligned with each other, but it was unclear whether this alignment was actually correct in relation to the chassis.

To solve this problem, I rebuilt the original aluminum honeycomb sandwich chassis from 19 mm chipboard. Although this involved considerable extra work and additional costs, the effort was more than worth it for me. I mounted the wooden chassis on a sturdy frame made of wooden beams and fitted it with wheels, which made it mobile. After dismantling the wooden chassis, I was also able to use the remaining frame as a practical platform for further assembly.

With this construction I was able to scan the body and thus had a solid basis. Once I had roughly processed the scan, I was able to integrate the body into my CAD model as a reference. I was always guided by the fact that everything I designed on the frame actually had to fit into the body.

So far, so good – but it later turned out that this approach was not the best decision. It wasn’t until last year, when I was working on the steering and the seating position, that I realized that some tubes were in the way, as I had already finished the tubular frame. That’s why I had to retrofit a cut-out in the frame for the steering gear. However, finding suitable positions and mounting points was a particular challenge when designing the seats, as the space was severely restricted by the previously defined body layout. These problems cost me a lot of time, which I could have invested better in retrospect – but more on that later in the relevant chapter.

3.conclusion

Today, I would proceed the other way round: First determine the basic dimensions, then place the body in CAD and then determine the seat and steering wheel positions. I would only start constructing the frame once these parameters have been defined.

My friends in racing still laugh at me, because for them it would have been a matter of course to proceed in this way from the very beginning. Well, you’re always smarter afterwards – but considering that this was my only major mistake in the first three years, it somehow gives me hope


Network and community: My thanks to the silent heroes

You can’t do it without help!

A project like building a Ford GT40 MKIV replica is an immense challenge. You quickly realize that success depends not only on technical knowledge and hard work, but also on the people who support you. I wouldn’t be where I am today without the help of my network.

First and foremost: My wife Britta
The biggest thanks go to my wife Britta. Without her understanding, patience and support, this project would not be possible. She has not only tolerated countless hours spent in the workshop or at the computer, but has also always motivated me to keep going – even in difficult moments.

The GT40 community: inspiration and knowledge
The GT40s.com forum has been an integral part of my life for almost two decades. It’s far more than just a platform for sharing – it’s a worldwide family of enthusiasts who share a passion for these cars. The helpfulness and the wealth of technical and historical information is almost unbelievable.

Special thanks go to members such as Gregg Sidoti, Bob Putnam, Morten A. Larsen, Ian Anderson, Don Nye, Jac Mac and many others. They have all contributed significantly to my project with their knowledge and support. Whether it was about historical facts, technical details or even rare components – the community always had solutions at hand.

Local support: friends on site
I have also been lucky enough to be able to count on the help of friends and experts on site:

  • MotoParkAndy Kohler, technical director, and Klaus Mayershofer, design engineer, were and are indispensable, always ready to help, no matter what stupid question or idea I had – Andy’s favorite phrase was “You’ll go to the hospital with it”.
  • MTMMichi Weber from the development department and Dennis Duba in the electronics department have overcome many technical hurdles with their know-how.
  • Drive DynamicsUwe Bleck, fantastic kinematics expert and biggest critic of my “old man’s suspension”, and Anton Pfeifer, shock absorber specialist and native Bavarian, put the finishing touches to my suspension.
  • Danube laserChristoph Bauer, Managing Director, who was always ready to cut even the smallest sheet for me when necessary, I hope I haven’t annoyed you too much.
  • Erwin Ettinger: A true artist in the use of hammer, flex and welding equipment. Even if he thinks I’m crazy most of the time 🙂
  • “Flo” Dunst: What would I do without your lathe and milling machine? So many small parts….
  • Erhard Dörr: One of my best friends, who always motivates me when things get difficult. Here’s a big “Zefix!” just for you 🙂

I’ve probably forgotten a few more – sorry! As soon as I remember, I’ll post them here. I promise! Until then, sorry.

A network that connects
It’s fascinating to see how many people from a wide variety of fields were and still are willing to share their time and knowledge. I never really understood the term “network” before, but now I know better. The fact that so many people around the world are so enthusiastic about this project that they are willing to help me is one of the nicest aspects of the whole thing.

Thanks to all contributors
I would like to use this chapter to say thank you to each and every one of you. Be it through expertise, active support or simply motivating words – your contribution was priceless.

If there is one thing I have learned, it is that you are never alone, even in such a personal project. Behind every success, there are always the people who have worked in the background.

THANK YOU!

The role of software and technology in planning

Everything revolves around CAD

CAD software played a central role in my project right from the start. Without modern tools and technologies, it would simply have been impossible to realize such a complex project as the development of a complete racing car.

Getting started with TurboCAD

I started my work with TurboCAD, which was obvious: For over 20 years I have been running the TurboCAD Training Center and have been responsible for training courses in Germany, Austria and Switzerland. During this time, I have conducted hundreds of training courses and taught numerous customers how to design in 2D and 3D with TurboCAD.

I used this familiar software to create the first designs for the tubular frame and began with the kinematic design of the chassis in 2D. TurboCAD was ideal for this basic work – fast and efficient.

But I soon reached the limits of the program: TurboCAD ‘s functions were not sufficient for the next steps, especially the strength analysis of the frame.

The switch to Fusion 360

It was clear that I needed more powerful CAD software, so I decided to use Fusion 360. Although I have been working with CAD since 1998, this switch was a challenge. The software not only offered significantly more functions, but also a completely different approach to design. Especially the simulation was new to me and required intensive training.

Despite the extra effort, the change was worth it. Fusion 360 enabled me to perform strength analyses and more detailed modeling, as well as handling very large volumes of data, which was crucial for further planning.

Working with 3D scans

Another important part of my planning was working with 3D scans. I captured components such as the bodywork and the gearbox using an Artec EVA 3D scanner and the associated software. I used this data as a reference in my CAD model to ensure that the frame would fit under the GRP body.

I would especially like to thank my friends from MotoPark who not only supported me with the necessary hardware, but also helped with the preparation of the data. Without their help, this part of the work would have been much more difficult.

Chassis development with specialized software

For the development of the suspension I used the Suspension Analyzer from the company Performance Trends, Inc. from the USA. I also experimented with the online tool Suspension Geometry Calculator from racing_aspirations. Both programs offer different advantages and disadvantages and are among the few affordable options for private individuals – in contrast to the professional solutions, which can quickly cost tens of thousands of euros.

Conclusion

The use of software was essential during this phase of my project. Between 2019 and May 2021, I worked exclusively on design and planning – an intensive period in which countless hours were spent on development. Only then did the actual construction begin, with phases of design, the production of components and the actual assembly alternating again and again to this day. This iterative process requires patience, precision and, above all, a great deal of passion for every detail. But it is precisely this variety that makes this project so fascinating for me.


Construction method, materials and approaches

Historical origin: The aluminum sandwich chassis

The Ford GT40 MKIV was the first racing car to use an innovative aluminum sandwich chassis. This construction, consisting of straight panels, set standards for lightweight construction and stability at the time. Nevertheless, I quickly realized that it would be almost impossible to implement this design myself in such a way that all strength requirements would be met.

A look into the past: initial sketches as a basis

This is where my many years of membership of the GT40s.com forum came in handy. An acquaintance from the community, Bob Putnam, had once restored an original GT40 MKIV and created about twelve pages of simple hand sketches with the most important dimensions. He generously made these documents available to me – a milestone for my project, for which I am very grateful to him.

From paper to digital: CAD reconstruction

However, the sketches were anything but easy to decipher. (See below) I spent many hours interpreting the dimensions, converting them and transferring them to my CAD program. But the effort was worth it: piece by piece, the chassis took shape in digital form and allowed me to take a closer look at the design.

The perfect addition: original plans from Sweden

The biggest surprise came later when my friend Göran from Sweden sent me original plans of the chassis from the Ford racing department. These plans enabled me to check all the dimensions again and refine my CAD design. It was a fascinating moment to be able to understand the technology and precision of the engineers of the time at close quarters.

The modern approach: a tubular lattice frame as the basis

As early as 2018, it became clear to me that an aluminum sandwich chassis like the original was not feasible with my possibilities. Instead, I opted for a tubular trellis frame, which I planned in such a way that its external dimensions were within the original chassis. This decision allowed me to create a solid base that was both stable and technically feasible.

Optical illusion: The cladding with aluminum sheets

To achieve the visual impression of the aluminum honeycomb sandwich chassis, I planned to cover the tubular lattice frame on both sides with thin aluminum sheets. The resulting inward width deviation of around 15 mm due to the tube diameters was hardly noticeable and is practically invisible to the untrained eye. This makes it possible to create an authentic look, which visually mimics the original.

Detail work: rivets and angle strips

To further enhance the impression, I decided to install hundreds of rivets and numerous angle strips. Although these steps were time-consuming, they gave the frame the finishing touches and brought it even closer to the historical model.

Original vs. personal interpretation: focus on the chassis

Spoilt for choice

If you decide to recreate a Ford GT40 MKIV, you are inevitably faced with the question: How true to the original should the vehicle be? It was clear to me that I had to – and wanted to – make compromises in certain areas. The chassis in particular is an area where I deliberately deviated from the original design. My decision in favor of a modern chassis in this classic guise is based on three main considerations:

1. safety first

The long upper trailing arms on the rear axle, as used in the original, make perfect sense from a chassis point of view. They contribute to good geometry and stability. But what happens if the rear of the vehicle hits an obstacle first in an accident? The design carries the risk that these trailing arms could penetrate the passenger compartment and seriously injure the driver. This risk was unacceptable to me. Safety first, and that’s why I decided to use a more modern, safer design that minimizes such dangers.

2. driving stability and controllability

With an output of over 500 hp, a displacement of 7 liters, more than 700 Nm of torque and a vehicle weight of only around 1100 kilograms, the GT40 MKIV is already a beast. Without modern driving aids such as ABS or traction control, a vehicle like this demands everything from the driver. In order to better control the enormous power and dynamics, I wanted a chassis that was as simple and controllable as possible in terms of its basic kinematic design. A complicated or vulnerable geometry would only have led to problems here. With my modern solution, I have found a compromise that combines stability and riding pleasure.

3. a claim to modernity

Of course, a certain amount of ambition also plays a role. I wanted a car that was not only safe and controllable, but could also keep up with the chassis technologies of modern GT3 cars. I was less interested in historical correctness than in meeting my personal demands in terms of handling and performance. It’s impressive how far technology has come in the last 60 years and I wanted to use these advances to get the best out of my project.

My car, my decision

I am aware that not everyone will like my decisions. There are certainly purists who are critical of my approach. But ultimately I’m building this car for myself. It’s my dream, my project and my interpretation of a GT40 MKIV. The mixture of classic design and modern technology is what makes the vehicle so special for me – and that’s what matters.

How I came to the body components

1. introduction: The start of the search

What was the trigger?
When I started building my Ford GT40 MKIV, I knew that the body panels would be one of the biggest puzzles of the whole project. The MKIV is a car that has a very distinctive shape and is very different from its MK I and MK II predecessors. So for my replica build, the right body parts are crucial to make the car look authentic. It was clear to me right from the start that I would face many hurdles in my search for parts that were true to the original – and that turned out to be true.

The challenge:
The body of a classic racing car like the GT40 is not easy to find. As this car is a model that was developed more than 50 years ago, there are only a few suppliers who supply original parts. And even when you do find them, they are usually extremely expensive or simply no longer available. So I had to find a way to get body parts that were both high quality and realistic without breaking my budget.

2. research and first attempts

How did I proceed?
About 12 years ago, there was a brief glimmer of hope: a friend from the USA imported a kit and wanted to sell it as a European dealer. But tragically he died in an accident, and for me the subject seemed a long way off again. When I was finally ready to contact the kit manufacturer Fran Hall from RCR (Race Car Replicas) in the USA, I found out that he was no longer allowed to sell the body parts due to an ongoing legal dispute.

Weighing up the options:
At first it looked as if there would be no way of getting hold of the parts. But then I came across an interesting twist: RCR was sourcing its parts from another supplier – a certain Gregg Sidoti from New York. Even more intriguing, he was also active on the same forum I’ve been a member of for over 20 years – GT40s.com. This discovery was a game changer.

3. the breakthrough: success story

After learning that Gregg Sidoti was the original supplier of the body parts, I contacted him directly. It turned out that Gregg had a fascinating story to tell: almost 30 years ago, he came across original spare parts from the No. 4 factory car at a Shelby dealer. Without hesitation, he acquired these parts, which were like a piece of motorsport history for me.

But that’s not all – Gregg was clever enough to make a set of molds from these original parts. He later used these molds to reproduce the body parts that would now make my project possible. It was as if a door had opened that had previously been closed. And when he finally offered to sell me the original parts, it was a moment for me that took the whole project to a new level.

4. procurement and first impressions

Shipping the parts was a particular challenge. Gregg, as an experienced lawyer, had the contacts and knowledge to organize the process, but I had to step in with practical details such as procuring the right impregnated wood for the huge transport crate. Together we found a solution and finally everything was ready for transportation from New York. Of course, this involved a lot of paperwork with the shipping company, customs, etc.

When the box arrived, it was a moment full of excitement. The sheer size and weight already gave me an idea of what was to come. In the end, the process went without a hitch and when I opened the box, the first glance far exceeded my expectations.

5. the quality of the parts

The body parts that I have received undoubtedly bear the hallmarks of their time. From today’s perspective, they appear imprecise and heavy. With modern manufacturing methods, they could be produced more precisely and, above all, much more easily. But the special thing about these parts is not their perfection, but their history.

These parts were manufactured under the conditions of a racing team that was working with almost unlimited financial resources – but also under enormous time pressure. There were only a few months between the 24 Hours of Le Mans races in 1966 and 1967 to develop and build these cars. The precision of the GRP parts was not a priority at the time. What mattered was functionality: a racing car that would win not because of its looks, but because of its speed and reliability.

For me, that is precisely the core of their significance. These parts bring a piece of the incredible time and spirit that prevailed back then into my car. Each component tells its own story, and this story becomes part of my project.

6 Reflection: What I have learned

The path to the body parts was anything but easy, but that’s what made it exciting. Looking back, I realized how important perseverance and the right contacts are. Without the support of Gregg Sidoti and the long-standing connections in the forum, I would probably never have got the parts.

The practical challenges – from finding the right wood for the transport crate to organizing the transport – also demanded a lot from me. But in the end, every effort was worth it.

This stage of my project shows me that it’s not just the parts themselves that matter, but also the story behind them. It is these small successes and encounters that make building my GT40 MKIV something very special.

Why the Ford GT40 MKIV?

Even as a child, I was captivated by a small but fascinating model car. It was a Ford GT40 MKIV that my father gave me at the beginning of the 1970s. I can still remember the moment when I held the model in my hands for the first time. The shape of this car, its aerodynamics and its aggressive look still fascinate me to this day. But it wasn’t just the model itself that impressed me, but the history and heritage it embodied.

The real turning point came when I saw the legendary movie “Le Mans” with Steve McQueen for the first time. At that moment, I was hooked for good. The myth of Le Mans and the challenge of driving a 24-hour race still fascinate me to this day.

For me, the Ford GT40, especially the MKIV version, is more than just a car – it was a symbol of speed, innovation and the unstoppable will to build the best racing car.

It was no longer just a dream, but a goal: I wanted to own such a racing car, but not just any car, but the Ford GT40 MKIV – the car that played a decisive role in the history of Le Mans. The MKIV, which won Le Mans in 1967, has a special significance for me. Its technical sophistication, coupled with its unmistakable design, have never let go of me.

Since then, I have cherished the idea of creating this masterpiece of engineering myself. It is more than just a project; it is the fulfillment of a childhood dream, the pursuit of perfection that I unfortunately never achieve and the fascination for a vehicle that has been with me for decades.